The creation of a programmer that can be used with different types of microcontrollers produced by MICROCHIP certainly simplifies the life of the hobbyist.
This project involves the creation of a version that I have reworked and simplified of Lorenzo Lutti’s PROPIC2, a very widespread and very versatile non-intelligent parallel port programmer, with external power supply consisting of only 1 integrated circuit, 7 resistors and 2 transistors.
The peculiarity of this programmer lies in the division of the circuit into two parts: programmer board and board that houses the microcontroller.
Nothing special so far, you may be thinking, but you will realize that making the male connector directly on the PCB of the board that houses the microcontroller is a practical and functional solution, to say the least.
The idea came to me from the COMMODORE 64 cassette player connector, a CARD EDGE connector.
Do you remember the comb connector of the cassette player?
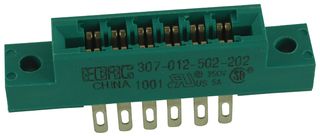
Well, just mount it on the programmer board and insert the card you need at the moment.
Brilliant, right? eh..eh..eh…
Let’s now move on to the description and implementation of the circuit.
.: THE CIRCUIT :.
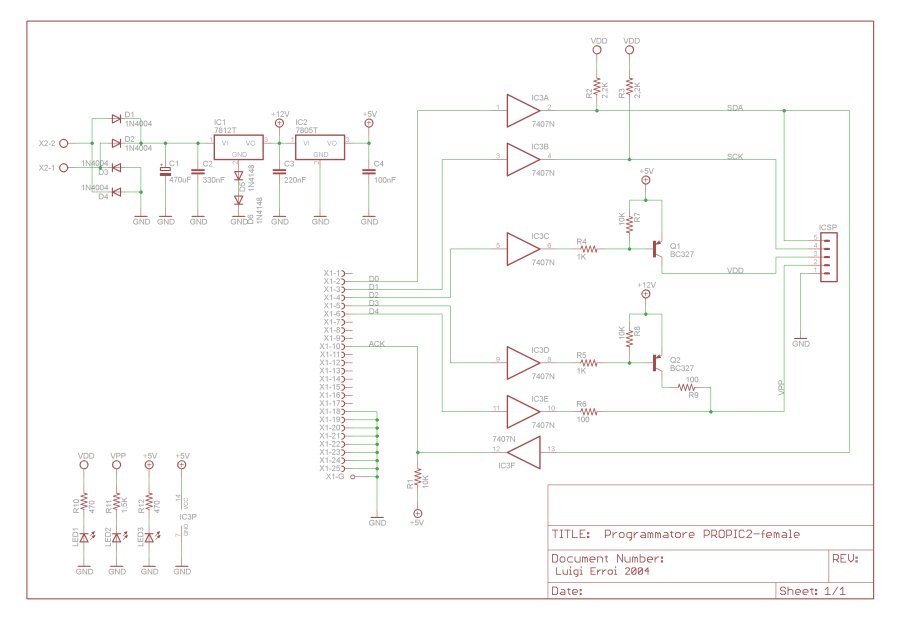
The +5V and +13.2V voltages (controlled via switch transistors) provide circuit power (VCC) and programming voltage, respectively.
An I2C bus (with clock line and bidirectional data line) connects the PC with the PIC.
The terminals on the left must be connected to the parallel port of the PC (pin numbers and signal names are shown).
The 5 terminals on the right are to be connected to the connector which in turn passes them to the different chips via the adapter board.
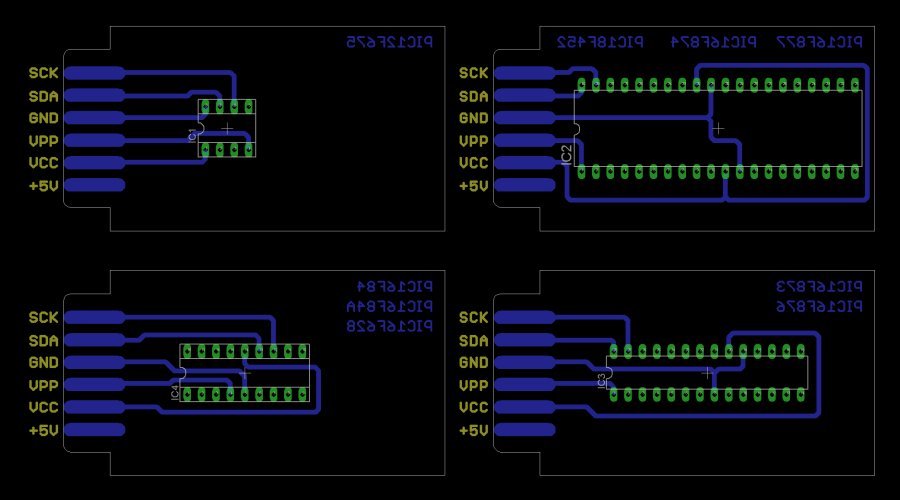
It is possible to program the following types of microcontrollers shown next to each adapter:
- Adapter1: 12F675;
- Adapter2: 16F84, 16F84A, 16F628;
- Adapter3: 16F873, 16F876;
- Adapter4: 16F874, 16F877, 18F452.
.: PROPIC2 – ADAPTERS:.
.: PROPIC2 – PART LIST :.
- R1 4,7 Kohm
- R2 4,7 Kohm
- R3 4,7 Kohm
- R4 4,7 Kohm
- R5 4,7 Kohm
- R6 4,7 Kohm
- R7 4,7 Kohm
- R8 1,5 Kohm
- R9 330 ohm
- R10 330 ohm
- C1 470uF 35V elettrolitic vert.
- C2 330nF
- C3 220nF
- C4 100F
- D1 1N4007
- D2 1N4007 – D3 1N4007
- D4 1N4007
- D5 1N4148
- D6 1N4148
- Q1, Q2 2N2907
- U1 SN74LS07
- IC2 7812
- IC3 7805
- LED Green
- LED Yellow
- LED Red
- DIP Socket 8 (4+4) pins
- DIP Socket 18 (9+9) pins
- DIP Socket 28 (14+14) pins
- DIP Socket 40 (20+20) pins
- CON1 Conn. pitch 3,96 6 pins
For the correct functioning of the programmer it is necessary to use an SN7407 or an SN74LS07. However, the 74HC and 74HCT versions may not work.
.: PROPIC2 – SCHEMATIC :.
.: PROPIC2 – PCB :.
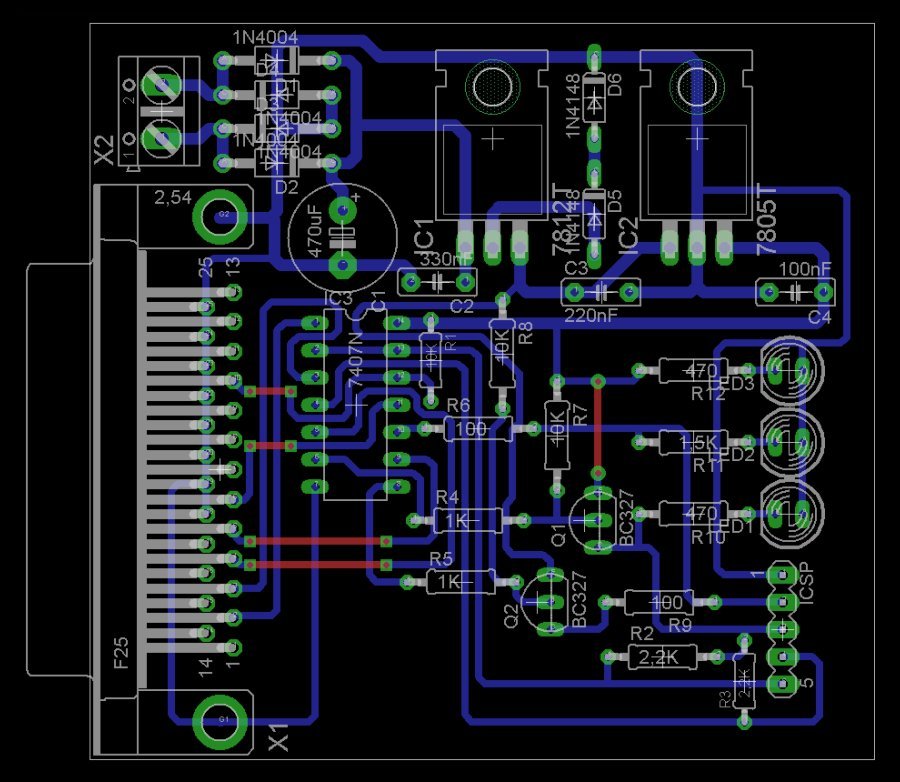
The image above shows the layout of the components on the programmer’s printed circuit board.
The addition of the LEDs that indicate the presence of the general power supply (green LED), and of the Vpp and Vcc towards the PIC to be programmed serves to verify when they are present because it could be harmful to insert or remove a chip from the socket while supply voltages are present.
For the same reason, the PIC must be inserted into the socket only when the control program is started, as this ensures the correct setting of the parallel port signals.
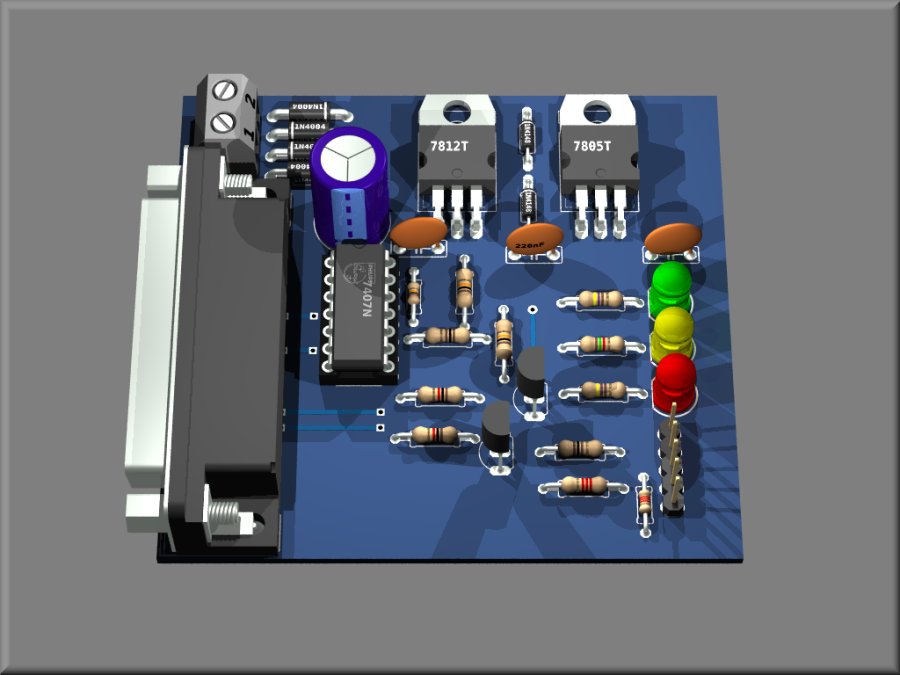
.: PROPIC2 – MAIN BOARD :.
.: PROPIC2 – ADAPTERS :.

This is the realization of the programmer.
Below are provided for download, in PDF format, the schematic, the PCB and the layout of the components together with the list of components.
If any of you do not have the possibility to produce himself the PCB or would simply like to have one ready to mount board, you can contact me via the CONTACTS link in the menu.
Attention!!! the right side for the exposure of the master in the creation of the printed circuit is the one that allows the text to be read.
As shown in the LAYOUT, the whole is seen from the component side.
You will therefore need to make a mirror of the print if necessary.
The file is in PDF format to avoid proportion errors.
I suggest, however, before printing to check the 1:1 print scale and not to select “fit to page”.